Building a real-time chat server is an exciting way to dive into the world of networked applications, and Go (Golang) is an excellent choice for this task due to its simplicity, concurrency model, and robust standard library. In this guide, we’ll walk through creating a WebSocket-based chat server.We’ll cover the architecture, code breakdown, and deployment considerations to help you build a scalable, real-time chat application.
Why Choose Golang for a Chat Server?
Golang is a modern programming language designed for simplicity, performance, and concurrency. Its key features make it ideal for building a chat server:
- Concurrency with Goroutines: Go’s lightweight goroutines make handling multiple client connections a breeze.
- WebSocket Support: The standard library and community packages like gorilla/websocket provide robust WebSocket support for real-time communication.
- Simplicity: Go’s minimalistic syntax reduces boilerplate, letting you focus on functionality.
- Performance: Compiled to machine code, Go applications are fast and efficient, perfect for handling real-time traffic.
Project Overview
The chat server we’re building consists of:
- A WebSocket server to handle real-time communication.
- A simple HTML frontend for users to send and receive messages.
- A Go backend to manage client connections and broadcast messages.
The architecture is straightforward:
- Clients connect to the server via WebSockets.
- The server maintains a list of connected clients.
- When a client sends a message, the server broadcasts it to all other clients.
Prerequisites
Before diving into the code, ensure you have:
- Go: Installed on your system (version 1.16 or later recommended).
- Basic Knowledge: Familiarity with Go, HTML, and WebSockets.
Step 1: Setting Up the Project
Create a new directory for your chat server and initialize a Go module:
mkdir chat-server
cd chat-server
go mod init chat-server
Install the required dependencies, including the gorilla/websocket package for WebSocket support:
go get github.com/gorilla/websocketThe project structure will look like this, Make sure to create these files and folders before continuing.
chat-server/
├── main.go
|-- client.go
|-- room.go
├── templates/
│   └── index.html
└── go.mod
Step 2: Building client
We consider each user which wants to connect to our server a “client”, so we need to model this kind of user, and actually each user is a “Websocket Client”.
Let’s model it using Golang structs.
In client.go, copy and paste the below code:
package main

import (
	"github.com/gorilla/websocket"
)

type client struct {
	socket *websocket.Conn
	send   chan []byte
	room   *room
}

func (c *client) read() {
	defer c.socket.Close()
	for {
		_, msg, err := c.socket.ReadMessage()
		if err != nil {
			return
		}
		c.room.forward <- msg
	}
}

func (c *client) write() {
	defer c.socket.Close()
	for msg := range c.send {
		err := c.socket.WriteMessage(websocket.TextMessage, msg)
		if err != nil {
			return
		}
	}
}
First we have imported the “github.com/gorilla/websocket”, we have this because we need a pointer to a client’s websocket connection.
Second we have defined the client struct type will all necessary properties:
socket: A pointer to a websocket connection
send: A channel for user to send it’s messages to.
room: A room which indicates which room the user has joined.
After that, We have defined two receiver functions for the client type:
read: to read messages from the socket
write: to write messages to the socket.
Step 2: Building room
“room” is actually a struct which holds some information about the clients which has joined, and a means of communication for sending messages to the clients which are currently joined the room.
In “room.go” copy and paste these contents:
package main

import (
	"log"
	"net/http"

	"github.com/gorilla/websocket"
)

type room struct {
	forward chan []byte
	join    chan *client
	leave   chan *client
	clients map[*client]bool
}

func newRoom() *room {
	return &room{
		forward: make(chan []byte),
		join:    make(chan *client),
		leave:   make(chan *client),
		clients: make(map[*client]bool),
	}
}

func (r *room) run() {
	for {
		select {
		case client := <-r.join:
			// Client is joining
			r.clients[client] = true
		case client := <-r.leave:
			// Client is leaving
			delete(r.clients, client)
			close(client.send)
		case msg := <-r.forward:
			// Forward the message to all clients
			for client := range r.clients {
				client.send <- msg
			}
		}
	}
}

const (
	socketBufferSize  = 1024
	messageBufferSize = 256
)

var upgrader = &websocket.Upgrader{ReadBufferSize: socketBufferSize, WriteBufferSize: messageBufferSize}

func (r *room) ServeHTTP(w http.ResponseWriter, req *http.Request) {
	socket, err := upgrader.Upgrade(w, req, nil)
	if err != nil {
		log.Fatal("ServeHTTP:", err)
		return
	}
	client := &client{
		socket: socket,
		send:   make(chan []byte, messageBufferSize),
		room:   r,
	}
	r.join <- client
	defer func() {
		r.leave <- client
	}()
	go client.write()
	client.read()
}
First we have defined the struct type for room which includes these fields:
“forward”: A byte channel as a means to send messages to clients.
“join”: A *client channel as a means to join clients to the channel.
“leave”: Another *client channel as a means for us to know which client (user) wants to left the room.
“clients”: A map of *client to bool, which saves the state of users (clients) joined the chat or leaving.
Next, We have a creator function, which creates a pointer of room construct, and as you can see it initiates the fields of “room” struct.
And then we have an important function named “run”, What it does basically is that it creates an infinite loop and uses a select-case syntax to check the values coming from the “room” field channels and based on that will join a client to the room, leave the client from the room or send message to the room clients.
Also we have the “ServeHTTP” function that takes the request and upgrades it to a WebSocket connection, and then i will send to join channel of the room, to inform the room that this websocket connection wants to join.
Step 3: Building HTML frontend
For testing purposes we need to get our hands dirty with a little HTML and Javascript, Why ? Because we need a way to test our chat server and the simplest thing is to create a simple frontend.
So open the “index.html” file and paste these codes into it:
<html>

<head>
    <title>Chat</title>
    <style>
        input {
            display: block;
        }

        ul {
            list-style: none;
        }
    </style>
</head>

<body>
    <ul id="messages"></ul>
    <form id="chatbox">
        <textarea></textarea>
        <input type="submit" value="Send" />
    </form>
    <script src="//ajax.googleapis.com/ajax/libs/jquery/1.11.1/jquery.min.js">
    </script>
    <script>
        $(function () {
            var socket = null;
            var msgBox = $("#chatbox textarea");
            var messages = $("#messages");
            $("#chatbox").submit(function () {
                console.log("Called Submit!")
                if (!msgBox.val()) return false;
                if (!socket) {
                    console.log("There is not socket connection")
                    alert("Error: There is no socket connection.");
                    return false;
                }
                socket.send(msgBox.val());
                msgBox.val("");
                return false;
            });
            if (!window["WebSocket"]) {
                console.log("Error: Your browser does not support web sockets.")
                alert("Error: Your browser does not support web sockets.")
            } else {
                socket = new WebSocket("ws://localhost:8080/room");
                socket.onclose = function () {
                    alert("Connection has been closed.");
                    console.log("Connection has been closed.")
                }
                socket.onmessage = function (e) {
                    console.log("Message has come")
                    console.log(e.data)
                    messages.append($("<li>").text(e.data));
                }
            }
        });
    </script>
</body>

</html>
Don’t worry about these, It’s just creates a simple text input for the user to enter their chat message, The code will automatically creates a Socket connection to chat server, when we open it on the browser after we have created the backend. We’ll see at the end.
Step 4: Building main.go, out entrypoint
So to gather this all, we need to put these content into “main.go” file:
package main

import (
	"html/template"
	"log"
	"net/http"
	"path/filepath"
	"sync"
)

type templateHandler struct {
	once     sync.Once
	filename string
	templ    *template.Template
}

func (t *templateHandler) ServeHTTP(w http.ResponseWriter, r *http.Request) {
	t.once.Do(func() {
		t.templ = template.Must(template.ParseFiles(filepath.Join("templates", t.filename)))
	})
	t.templ.Execute(w, nil)
}

func main() {
	r := newRoom()
	http.Handle("/", &templateHandler{filename: "chat.html"})
	http.Handle("/room", r)

	go r.run()

	if err := http.ListenAndServe(":8080", nil); err != nil {
		log.Fatal("Listen and Serve:", err)
	}
}
Don’t worry about this, If you don’t understand it, I’ll explain it:
We want the html page to be loaded for the user’s browser, In go if we want to render an HTML page (“index.html”) cleanly to the user we need to these:
- Define a custom type named “templateHandler” with the values provided in the code.
- Define a method named “ServeHTTP” as a receiver function for out type (“templateHandler”)
- And then easily use it like this in the main function:
- http.Handle(“/”, &templateHandler{filename: “index.html”})
What it’s doing is simply compile the index.html template into our go binary and that makes it easy to run our go project in different computers and systems.
So Let’s move on.
func main() {
	r := newRoom()
	http.Handle("/", &templateHandler{filename: "chat.html"})
	http.Handle("/room", r)

	go r.run()

	if err := http.ListenAndServe(":8080", nil); err != nil {
		log.Fatal("Listen and Serve:", err)
	}
}
As you can see in the main function, we have create a “room” for our clients to connect.
Then it defines two routes, The first one which I have explained and the second one which points to “ServeHTTP” function of the room type, Which again I have explained it above.
Then finally it will run the “r.run()” method inside another goroutine to handle the room functionalities.
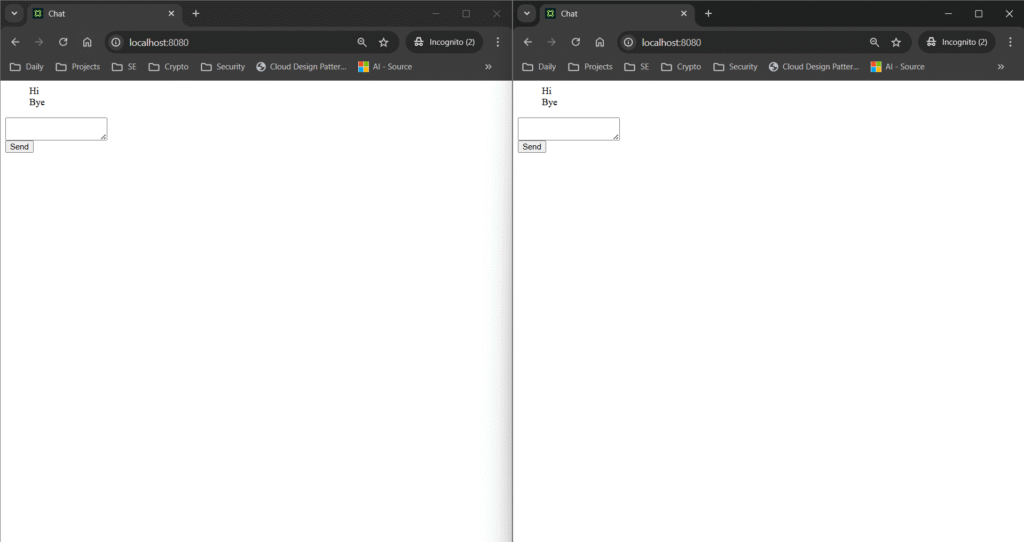
Step 5: Running the project
Open two browsers side by side and start chatting!
Conclusion:
Go is a powerful programming language for network programs including Websocket programs, But what we saw in this tutorial is a simple example and an entrypoint to create such programs. Be sure to do a lot of research if you want to make production grade chat systems.
Leave a Reply